Every serious finger drummer reaches the same wall eventually. You’re mid-session, the groove is locking in, and then a fill falls apart—not because your timing is off, not because your velocity is inconsistent, but because your hands physically can’t get there in time. The pad you need is three positions away from where your thumb just landed, and by the time your ring finger crosses over, the moment is gone.
That wall isn’t a skill problem. It’s an architecture problem.
Your pad layout is not a neutral grid of sound triggers. It is a physical instrument in its own right—one with its own biomechanical logic, its own demands on your musculature, and its own ceiling of what’s humanly possible at tempo. The layout you commit to will shape which genres feel natural, which patterns feel effortless, and which techniques are permanently out of reach until you’re willing to rebuild your muscle memory from the ground up.
This guide is an architectural breakdown of some of the most effective pad layout strategies in finger drumming: the Linear Baseline, the Double-Hat Split, the Vertical Column Strip, and the Sample Chop Matrix. We’ll examine the physics behind each, map the ergonomic trade-offs, and demonstrate the exact same groove performed across all four configurations so you can hear—and see—how layout shapes performance at every level.
There are no wrong answers here. But there are better answers for your music.
What's Inside This Guide
The Physics of Pad Layouts
Before we examine any specific configuration, we need to establish a shared language for understanding why some layouts work at speed and others collapse the moment a pattern gets complex. This isn’t theory for theory’s sake—every ergonomic principle below has a direct, audible consequence in your performances.
The 4x4 Grid as a Physical Coordinate System
A 4x4 pad controller—whether you’re working on a Maschine MK3, an Ableton Push 3, a Novation Launchpad Pro, or an MPC One—gives you 16 pads arranged in a square roughly 170–220mm wide and 170–220mm tall. That means each pad occupies approximately 40–50mm of horizontal and vertical space, with a few millimetres of gap between them.
For finger drumming, this creates a fundamental spatial constraint: the total grid is only marginally wider than a single hand’s span. With your palm hovering naturally above the centre of the grid, your thumb can comfortably reach approximately Pad 1 (bottom-left), your index finger covers the bottom-centre region, and your pinky strains to reach Pad 4 (bottom-right) without twisting the wrist. The moment a pattern requires hitting Pad 1 and Pad 4 in rapid succession with the same hand, you’re no longer playing freely—you’re managing hand geometry under time pressure.
This is the central constraint that every pad layout is trying to solve. The differences between layouts are essentially different strategies for distributing your sounds across a 4x4 coordinate space so that the combinations you play most often are also the combinations that are physically easiest to execute.
Hand Dominance and the Asymmetry of Performance
Most finger drummers unconsciously anchor their dominant hand to the most rhythmically critical element of a pattern: almost always the kick and snare. This is efficient in the short term—your strongest, most precise hand controls the rhythmic spine—but it creates a significant bottleneck as patterns grow in complexity.
When kick, snare, and hi-hat are all clustered within the same hand’s comfortable zone, every 16th-note hi-hat fill requires your dominant hand to simultaneously maintain kick and snare placement while also running rapid alternating hits on the hat. This is biomechanically analogous to asking a pianist to play a bass line, chord voicings, and a melodic run with the left hand only. The hand doesn’t have enough independent finger articulation to handle that density without tension, hesitation, or dropped hits.
Effective pad layouts for intermediate-to-advanced players deliberately force a hand-to-hand separation by distributing the rhythmic elements across the grid so that both hands have a defined role. The question each layout answers differently is: which hand gets what, and where does the boundary sit?
Radial and Ulnar Deviation: The Hidden Wrist Killer
When a musician’s wrist bends toward the thumb side, that’s radial deviation. When it bends toward the pinky side, that’s ulnar deviation. Both are natural movements, but both create tension and reduce precision when sustained over extended play sessions.
On a flat pad controller, the most ergonomically neutral wrist position places the hand above the centre of whatever zone you’re working in, with the wrist straight and the forearm relaxed. Horizontal layouts (sounds arranged left-to-right across a single row) are the most common source of chronic ulnar deviation, because players instinctively anchor their wrist above Pad 1 (kick) while stretching their index and middle fingers rightward toward the hi-hat, pulling the wrist into a sustained bent position.
Vertical layouts mitigate this entirely: moving your hand up and down a column keeps the wrist in a neutral, forward-facing position throughout the movement. Split layouts solve it differently, by keeping each hand within a narrower horizontal zone.
Understanding deviation matters practically: a layout that causes sustained wrist deviation will produce inconsistent velocity in your quieter ghost notes first—the subtle dynamic losses appear long before any pain develops. If your ghost notes are disappearing in long sessions, check your wrist angle before you check your technique.
Finger Isolation: Index, Middle, Ring, and the Role of the Thumb
Each finger brings a different performance profile to pad work:
- Thumb: High force, low speed, poor lateral isolation. Ideal for kick drums that require consistent weighty transients. Poor choice for rapid alternating patterns.
- Index finger: The strongest and most precise of the non-thumb fingers. Ideal for snare, primary hi-hat, or any element that demands both force and timing control.
- Middle finger: Slightly longer reach and high independence. Excellent for secondary hi-hat or ghost note snare positions.
- Ring finger: Moderate strength, naturally subordinate to the middle finger’s movements. Best reserved for accent pads, open hi-hat, or crash elements that fire rarely.
- Pinky: Weakest and least isolated. Suitable only for rare accent triggers or secondary melodic chops in sample layouts—avoid assigning time-critical rhythmic elements here.
Every layout design implicitly assigns fingers to elements based on pad position. A layout that puts your hi-hat directly to the right of your snare will force your ring finger onto hi-hat duty, which is workable at moderate tempo but physically limiting at 140+ BPM. Recognising these implicit finger assignments—and proactively designing around them—is one of the most underrated layout optimisation strategies in finger drumming.
Velocity Consistency and the Transient Window
Digital percussion samples respond to note velocity as a linear or curved control signal mapped to the sample’s amplitude and, often, its timbre—harder velocity triggering brighter, fuller versions of the same sound. For acoustic drum emulation, the difference between a 60-velocity ghost snare and a 90-velocity snare backbeat needs to be sharp, repeatable, and intentional.
The problem is that velocity consistency is highly dependent on the physical geometry of your strike. When your finger drops straight down onto a pad directly beneath it, the strike is clean, controllable, and consistent. When your finger reaches laterally across to a pad at the edge of your comfortable range, the approach angle changes—your finger comes in at an angle rather than straight down, the contact area shifts to the fingertip edge rather than the pad, and your velocity control degrades noticeably.
This is the hidden cost of a poorly-chosen layout: not just wrong notes, but velocity inconsistency that washes out your dynamic range. A ghost note pattern that reads perfectly in your sequencer might produce noticeably uneven dynamics in live performance simply because your ring finger is stretching to reach a pad that would be far better assigned to your index finger.
With this framework in place, let’s examine each layout archetype in detail.

Core Acoustic Layout 1: The Linear Baseline
  PAD13|PAD14|PAD15|PAD16
  PAD09|PAD10|PAD11|PAD12
  PAD05|PAD06|PAD07|PAD08
  KICK |SNARE|HIHAT|OPEN H
Mechanics
The Linear Baseline is the instinctive first layout for the overwhelming majority of new finger drummers—and for very good reason. It mirrors the way we read and process musical notation: left to right, low to high, from the most foundational element (kick) to the most open and sustained (open hi-hat). The bottom row becomes a complete, self-contained rhythm section, leaving all twelve pads above it entirely free for additional instrumentation.
At its core, this layout places all four primary drum elements in a single horizontal line: Kick at Pad 1, Snare at Pad 2, Closed Hi-Hat at Pad 3, and Open Hi-Hat at Pad 4. Rather than overloading a single hand, players split this row across both hands, using the middle and index fingers of the left hand for the left side (Kick and Snare), and the index and middle fingers of the right hand for the right side (Closed and Open Hi-Hat). The logic is transparent, symmetrical in finger choice, and learnable in a single session.
The upper rows—Pads 5 through 16—are a blank canvas. Advanced players using this layout typically populate them with toms, crashes, rides, claps, rimshots, shakers, and auxiliary percussion, creating a full acoustic kit map that reads top-to-bottom like an expanded drum rack. The grid, in this interpretation, becomes a visual overhead view of a real drum kit’s sound map.
The Linear Bottleneck at Tempo
The fundamental limitation of this layout doesn’t manifest at slow tempos. At 80–95 BPM, playing a basic kick-snare-hihat groove using this two-handed split is entirely comfortable. The breakdown appears when patterns demand rapid interaction between the hands, or when the rhythmic complexity shifts heavily toward one side of the horizontal row.
Consider a basic trap-influenced hi-hat pattern: continuous 16th notes across the hat, with a kick on beat one and beat 2/and, and a snare on beats 2 and 4. While the left hand handles the kick/snare foundation, the right hand’s index and middle fingers are forced to shoulder the entire rapid 16th-note hat and open-hat stream alone. Because the elements are laid out sequentially on a single horizontal axis, the two hands are locked into rigid, static zones.
At 120 BPM, this uneven distribution of labor becomes demanding. At 140 BPM, it becomes a test of sheer physical endurance for the right hand rather than musical expression. Because the layout doesn’t allow for alternating hands on a single element (like rolling a hi-hat with both index fingers), one hand tightens, velocity consistency drops, ghost notes disappear, and the open hat gets clipped because a single finger doesn’t have time to recover from its last hit before the next event fires.
This is the linear bottleneck: rhythmic velocity and speed are choked because the layout forces a strict positional separation between left-hand and right-hand elements.
Pros
The lowest possible learning curve for new finger drummers—pattern logic is immediately intuitive
The upper 12 pads remain completely unassigned, providing maximum flexibility for full acoustic kit mapping, melodic elements, or loop triggers
Excellent for step-sequencing hybrid workflows where you’re playing live fills over a programmed base
Mirrors standard drum machine notation (left = low/kick, right = high/hats), making it easy to translate between screen and pad
Distributes the main kit pieces logically across the dominant fingers (Index and Middle) of both hands
Compatible with the muscle memory of most MIDI keyboard players transitioning to pad performance
Cons
Critical single-hand bottleneck for the right hand at 16th-note hi-hat density above approximately 110–120 BPM, as it cannot share the speed load with the left hand
Unbalanced physical exertion, where the right hand performs high-frequency repetition while the left hand remains relatively static on the kick and snare
Total lack of hand-alternation capabilities (e.g., executing a rapid 32nd-note snare roll or hi-hat roll using both hands on a single pad is impossible)
The rigid left-to-right division causes finger crowding and potential collisions at the center border (Snare and Closed Hi-Hat) during complex ghost-note patterns or synchronous hits
While it uses two hands, the layout provides no structural incentive to develop advanced, integrated two-handed independence, creating a long-term ceiling on rhythmic complexity
Best For
Beginners learning their first finger drumming patterns; lo-fi and boom-bap producers who build their rhythmic foundation in a sequencer and play occasional live fills; step-sequencing hybrids; anyone who needs a functional kit map immediately without investing in layout study.

Core Acoustic Layout 2: The Double-Hat Split
  PAD13|PAD14|PAD15|PAD16
  PAD09|PAD10|PAD11|PAD12
  HIHAT|PAD06|PAD07|PAD08
  KICK |SNARE|HIHAT|PAD04
Mechanics
The Double-Hat Split is the first layout that fundamentally solves the Linear Baseline’s single-hand bottleneck. It does this through a precise and elegant architectural move: it takes the hi-hat and duplicates it across two positions—one in the lower row, one in the row above—in an ergonomic triangle relative to the kick and snare.
In the standard Double-Hat Split configuration, the Kick anchors at Pad 1 (lower-left), the Snare sits at Pad 2 (lower-centre-left), and two Hi-Hat positions—one closed and one alternating closed—occupy Pad 3 (lower-centre-right) and Pad 5 (directly above the kick). The crucial innovation is Pad 5’s placement: directly above Pad 1, reachable by the left hand without any wrist deviation, while the right hand manages the kick-snare axis below.
This creates something that we can call the ergonomic triangle: Kick (bottom-left), Snare (bottom-centre), Hi-Hat A (centre-left), Hi-Hat B (lower-centre-right). The triangle’s geometry means that a continuous 16th-note hi-hat stream can be executed by alternating between Pad 3 and Pad 5 across two hands—or across the index and middle fingers of two independent zones—without ever creating spatial conflict with the kick or snare positions.
The Two-Handed Separation Principle
The deeper insight of the Double-Hat Split is what it forces you to learn: genuine hand independence. In the linear layout, it’s possible—even comfortable—to play everything with one dominant hand. In the split layout, the physical separation of the two hi-hat positions makes two-handed playing not just possible but structurally encouraged.
The practical execution: the left hand occupies the lower-left zone (Kick + Hi-Hat A), and the right hand occupies the lower-centre zone (Snare + Hi-Hat B). When playing a continuous eighth-note hi-hat pattern, you alternate: left hand hi-hat, right hand hi-hat, left, right—exactly as a real drummer alternates sticks between right and left hand on the hi-hat, while the same hands independently fire kick and snare on their respective beats.
This isn’t just a cosmetic analogy to real drumming. It’s a genuine functional parallel that makes acoustic groove emulation significantly more realistic. The timing nuances that emerge naturally when two hands alternate—micro-timing variations, slight velocity differences between the stronger and weaker hand—are the same nuances that give live drumming its human feel.
Ghost Notes and Dynamic Complexity
The Double-Hat Split’s structural superiority becomes most pronounced in ghost note territory. A ghost note is a very quiet snare hit—typically 20–45 velocity—played between the primary backbeats to create rhythmic texture and forward momentum. In acoustic drumming, they’re often played with the non-dominant hand (typically the left) while the right hand runs the hi-hat.
In the Linear Baseline, adding ghost notes while maintaining hi-hat continuity means your index finger must somehow jump between snare ghost note position (Pad 2) and hi-hat position (Pad 3) at 16th-note resolution—and modulate velocity dramatically between those hits. This is physically possible but requires an exceptional level of fine motor control that takes years to develop reliably.
In the Double-Hat Split, the left hand can handle snare ghost notes on Pad 2 while the right hand continues running Hi-Hat B on Pad 3. The two operations never physically conflict. Your index fingers never cross. Velocity control on each element becomes independent and therefore more reliable. Ghost notes that previously required heroic concentration become routine.
Pros
- Eliminates the single-hand bottleneck entirely by distributing hi-hat across both hands
- Enables true two-handed playing technique that directly mirrors real acoustic drumming mechanics
- Ghost note patterns become physically non-conflicting—left hand snare/ghost, right hand hi-hat, simultaneously
- At high tempos (140–165 BPM trap), continuous 16th-note or 32nd-note hi-hat streams are physically manageable because the workload is split between two hands
- Wrist geometry is significantly improved: each hand stays within its own lateral zone, minimising radial/ulnar deviation
- Develops hand independence that transfers directly to every other layout type
- The ergonomic triangle of Kick/Snare/Hi-Hat A/Hi-Hat B can be adapted to a wide range of grid controller sizes
Cons
- Requires meaningful investment in two-handed coordination before the layout’s advantages become apparent—beginners often find it more confusing than the linear layout initially
- The mental mapping of “same sound in two positions” can cause pattern-reading confusion when transcribing from notation or step sequencer grids
- Less upper-pad real estate for auxiliary percussion, since Pad 5 is committed to the second hi-hat position
- The two-handed approach demands explicit choreography for every pattern—you can’t default to a single dominant hand, which increases cognitive load during learning
- Simultaneous kick-and-hi-hat-A events (both on the left hand) require deliberate practice to execute cleanly without one event masking the other
Best For
Intermediate-to-advanced finger drummers pursuing acoustic realism; boom-bap and jazz producers who need ghost note capability; trap and drill producers running fast 16th-note and 32nd-note hi-hat patterns; anyone willing to invest 2–4 weeks of dedicated layout adaptation for long-term performance gains.

Core Acoustic Layout 3: The Vertical Column Strip
  PAD13|PAD14|PAD15|PAD16
  PAD09|PAD10|PAD11|HIHAT
  PAD05|PAD06|PAD07|SNARE
  PAD01|PAD02|PAD03|KICK
Mechanics
The Vertical Column Strip is the most biomechanically elegant of the three acoustic layouts—and the most unusual-looking on paper. Instead of distributing drum elements across a horizontal bottom row, this configuration assigns the primary rhythm section to a single vertical column, typically the rightmost (Column 4) or leftmost (Column 1), creating a continuous up-and-down axis of Kick → Snare → Hi-Hat.
In the configuration shown above, Column 4 reads bottom-to-top: an empty auxiliary pad at Pad 4, then Kick at Pad 8, Snare at Pad 12, and Hi-Hat at Pad 16. The remaining 12 pads across Columns 1–3 are available for the full range of melodic, percussive, and loop-trigger assignments.
The physical movement paradigm is completely different from the horizontal layouts. Instead of tracking your hand laterally left and right across the grid, you move it vertically up and down the column—which closely maps to the natural up-and-down articulation of the wrist and forearm rather than the lateral deviation that horizontal layouts demand. Your wrist remains in a neutral position throughout, your elbow stays relaxed, and your shoulder doesn’t need to compensate for extended lateral reaches.
The Mirror Layout: Two Columns, Two Hands
The Vertical Column Strip’s deepest potential is unlocked when it’s deployed symmetrically: Column 1 and Column 4 both carry identical Kick-Snare-Hi-Hat assignments, creating a mirror image of the rhythm section on both the leftmost and rightmost edges of the grid.
In the mirror configuration, your left hand commands Column 1 and your right hand commands Column 4. Both hands can play any rhythmic element independently, because they each have access to the full kit. This means complex fills—where the left and right hand alternate hits up and down their respective columns—can be executed with the natural wrist mechanics of up-down movement on both sides, generating exceptional speed without physical tension.
For live performers who need to play with high physical intensity—striking pads with force for dynamic expression, moving rapidly between elements—the mirror column approach is the most physically sustainable of any layout. The movement is vertical and natural rather than lateral and strained, which means less fatigue over long sets and more consistent velocity throughout.
Scaling to Larger Grids
The Vertical Column Strip also scales exceptionally well when you graduate from a 4x4 to a larger grid. On an 8x8 Launchpad or a pad-extended controller, the column remains a constant physical reference: Column 8 always lives at the right edge, and its Kick-Snare-Hi-Hat assignment stays in the same spatial relationship to your body regardless of how many pads surround it.
Players who have learned the vertical layout on a 4x4 MPC can move to an 8x8 Launchpad for a performance with minimal disorientation—their column muscle memory transfers directly, even though the surrounding pad environment has doubled in size.
Pros
- The most ergonomically neutral wrist position of any layout: vertical movement keeps the forearm aligned and eliminates chronic ulnar/radial deviation
- Naturally encourages vertical hand movement that is faster and less fatiguing than lateral reaches at high velocity
- Mirror layout (Column 1 + Column 4) creates a fully ambidextrous two-handed system where both hands have equal access to all rhythmic elements
- Exceptional velocity consistency because the hand approaches each pad from directly above, not at an angle
- Scales directly to larger grid controllers without relearning finger assignments
- Live performance durability: vertical movement is physically less taxing over 60–90 minute sets than lateral hand stretching
- Leaves the interior 8–12 pads completely open for melodic content, sample chops, or additional percussion without interfering with the rhythmic spine
Cons
- The most counterintuitive layout for beginners—nothing about the visual arrangement of a vertical column “reads” like a drum kit or standard notation
- Restricts multi-finger rolling across a single element axis: you cannot rapidly alternate between kick variants or snare positions using horizontal finger rolls, because there is only one pad per element in the column
- The empty bottom row (Pads 1–4 in the configuration shown) can feel wasteful and creates spatial disorientation for players accustomed to a full bottom-row kit
- The interior 12 pads feel visually separated from the rhythmic column, which can make it harder to fluidly integrate melodic and rhythmic events in a single performance flow
- Adapting from a horizontal layout to vertical requires a full layout reset—partial hybrid approaches tend to fail because the muscle memory of both systems actively conflicts
Best For
Ergonomic-focused players concerned with long-term hand health and stamina; live performers playing at high physical intensity; producers who split their grid strictly between rhythmic and melodic zones; players transitioning to large-format controllers who want a universal muscle memory anchor point.

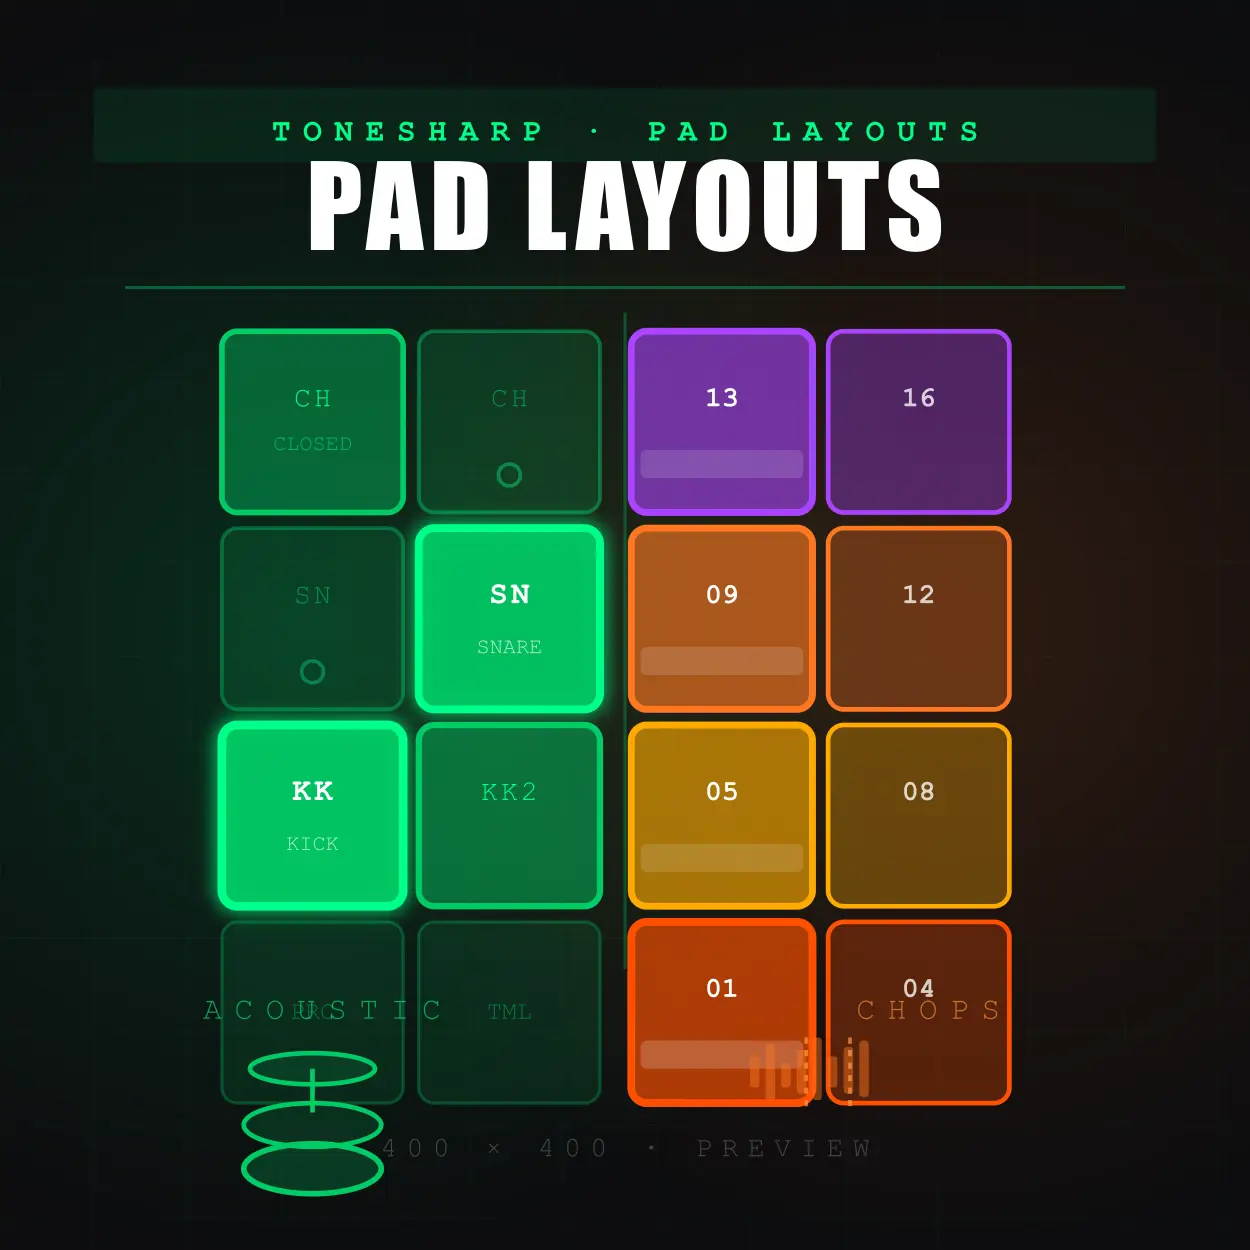
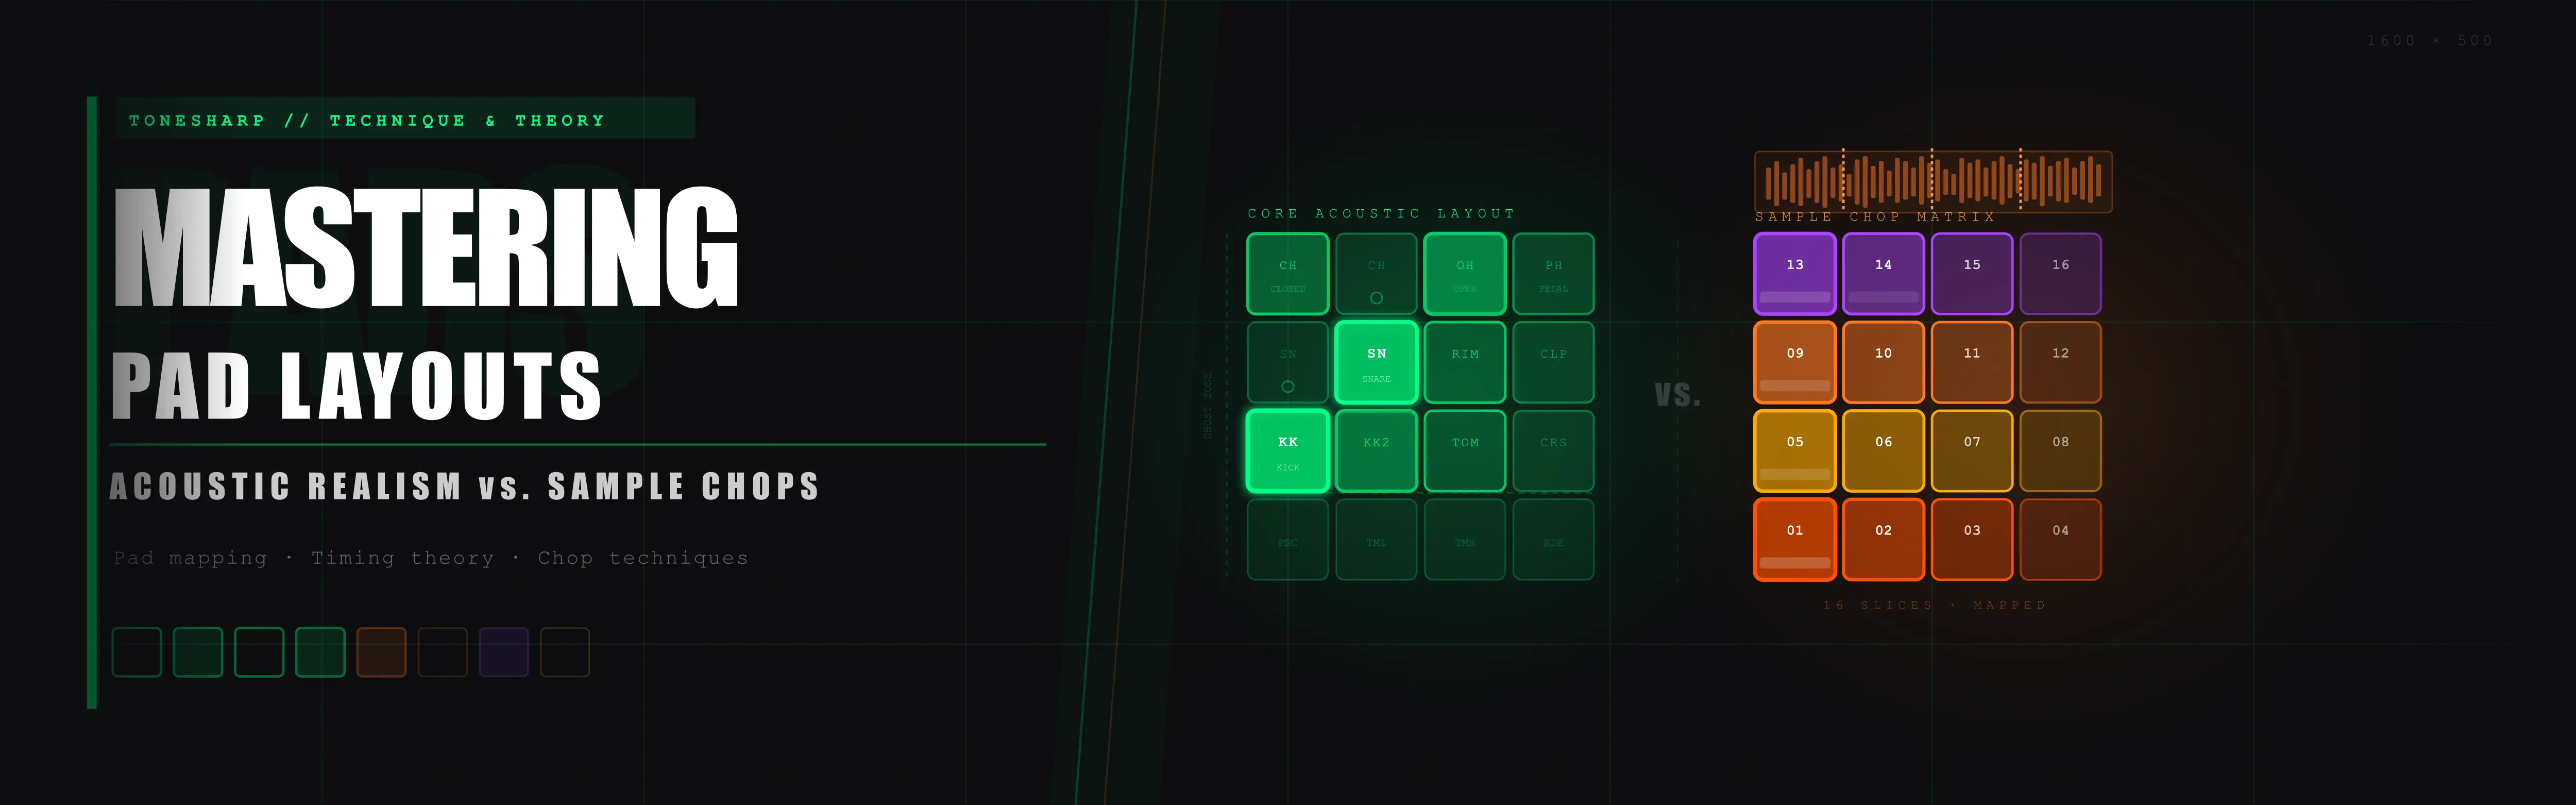
Sample-Based Layouts: The Chop Matrix
  CHOP13|CHOP14|CHOP15|CHOP16
  CHOP09|CHOP10|CHOP11|CHOP12
  CHOP05|CHOP06|CHOP07|CHOP08
  KICK  |SNARE |CHOP03|CHOP04
Mechanics
The Chop Matrix represents a philosophical departure from every acoustic layout we’ve examined. It doesn’t try to simulate a drum kit. It treats the 4x4 grid as an entirely different instrument—a chromatic melodic trigger array with percussion support—and compresses the drum kit into the minimum viable footprint to make room for something more compositionally powerful: the sample chop.
In the configuration shown, the bottom-left corner hosts just two primary drum elements: Kick at Pad 1 and Snare at Pad 2. Pads 3 and 4 in the bottom row may carry additional variations—a secondary kick, an open hat, or a rim shot—but the overwhelming majority of the grid (12–14 of 16 pads) is dedicated to chronological slices of a sampled loop, a vocal chop sequence, a bass line, or a melodic phrase.
The sample chop concept comes directly from the MPC tradition and the broader philosophy of hip-hop production: take a recorded loop—a jazz drum break, a soul vocal, a funk bass riff—and slice it into its individual rhythmic components, assigning each slice to a pad in chronological order. By triggering those slices in different sequences and rhythms, you can replay the original loop perfectly, rearrange its components into new patterns, or play melodic phrases that were never part of the original recording.
Chronological Slice Assignment
In a standard 16-slice chop layout (filling the entire 4x4 grid), slices are typically assigned in one of two orientations:
Row-based (left-to-right, bottom-to-top): Slice 1 at Pad 1, Slice 2 at Pad 2, through Slice 16 at Pad 16. This mirrors reading order and is the most common MPC default.
Column-based (bottom-to-top, left-to-right): Slice 1 at Pad 1, Slice 2 at Pad 5, Slice 3 at Pad 9, Slice 4 at Pad 13, Slice 5 at Pad 2… This mirrors the Vertical Column Strip logic and can create more natural hand movement for certain melodic patterns.
In the Chop Matrix configuration shown above—where kick and snare occupy Pads 1 and 2—the sample slices typically begin at Pad 3 and continue through Pad 16, giving you 14 chop slots alongside a minimal drum kit. This is the classic boom-bap beat-making layout: you can play your rhythmic foundation with the left-hand thumb and index finger on Pads 1 and 2, while your right hand—or the remaining fingers of your left hand—navigates the melodic sample territory.
The Unified Performance Paradigm
The Chop Matrix’s defining capability is what it enables at the performance level: simultaneous rhythm and melody in a single, unified instrument gesture. In a DAW-based workflow, rhythm and melody are typically handled in separate tracks, separate clips, separate mental layers. In the Chop Matrix, they collapse into a single physical surface.
When an experienced finger drummer has deeply internalized the spatial positions of a chop layout, they can freestyle-perform a complete hip-hop arrangement—bass notes, melodic hooks, rhythmic stabs, and drum foundation—all from one hand position on one controller. The phrasing that emerges has an organic, spontaneous quality that multi-track sequencing rarely replicates, because the physical proximity of different elements creates natural phrase relationships that wouldn’t occur to a producer working methodically in a piano roll.
This is what MPC culture understood from the beginning: the layout itself generates compositional ideas. Reaching upward from Pad 1 to Pad 13 doesn’t just play Chop 13—it creates a particular trajectory across the sample’s harmonic content that feels like a musical gesture, not a parameter entry. The grid is no longer just a trigger surface; it’s a compositional interface.
Pros
- Maximum creative integration: kick, snare, and sample chops are all co-present on a single surface, enabling fluid improvisational performance
- Unlocks the full MPC workflow tradition—Dilla-esque swing, natural melodic-rhythmic interplay, and spontaneous arrangement all emerge from the layout’s geometry
- The physical proximity of melodic slices generates compositional relationships that pure step-sequencing never offers
- Highly intuitive for producers transitioning from MPC workflow to pad performance
- In a live remix or DJ-style set context, the Chop Matrix allows real-time beat-switching between different sample banks while maintaining continuous drum rhythm
- No cognitive separation between “making the beat” and “performing the melody”—it’s one unified action
Cons
- Severe compression of the drum kit footprint: with only 2–4 pads dedicated to drums, you lose ghost notes, open hi-hat independence, toms, crashes, and all dynamic drum articulation
- The minimal drum section (Kick + Snare only) produces patterns that are rhythmically straightforward but dynamically flat—no layering, no velocity variation across multiple drum elements
- The chop-heavy grid requires significant sample preparation before performance: slices must be cleaned, tuned, and velocity-mapped correctly or the layout sounds incoherent
- Adapting to new samples requires re-learning the spatial melodic map from scratch—muscle memory built on Sample A doesn’t transfer to Sample B
- Not suitable for acoustic drum emulation in any serious sense—the grid simply can’t contain both a full drum kit and a melodic sample complement simultaneously
Best For
Sample-chopping producers working in hip-hop, boom-bap, and lo-fi; live beat performance artists who need to re-sequence loops in real time; electronic producers who use the pad as a melodic instrument with percussion support; MPC workflow converts making the transition to DAW-based performance.

Side-by-Side Comparison: The Same Beat, Four Ways
To truly understand how layout shapes performance, look at the exact same beat—a driving groove featuring a double kick hit, a syncopated snare ghost note, and steady hi-hats—re-mapped across our four configurations. Notice how the visual sequence shifts from horizontal rows to vertical columns and sample clusters, and consider how each mapping changes which fingers fire, when they cross, and where tension is likely to build at tempo.
The pattern: double kick on the downbeat, snare ghost on the ‘e’ of beat 2, snare backbeat on beat 3, continuous eighth-note hi-hat throughout.
Configuration 1: The Linear Baseline
All four elements arranged horizontally on the bottom row. The hi-hat runs continuously across Pad 3, requiring the right hand’s index finger to maintain steady eighth-note articulation while the left hand’s middle finger (Pad 1) fires the double kick and the left hand’s index finger (Pad 2) handles the syncopated ghost note. At 90 BPM, this is manageable. At 130 BPM, the right hand’s middle finger on the open hat (Pad 4) and its index finger on the closed hat (Pad 3) will begin to conflict, as that single hand must shoulder the entire high-frequency workload alone.
Configuration 2: The Double-Hat Split
The hi-hat on PAD3 now alternates with a secondary hi-hat position, distributing the eighth-note stream across two physical contact points. The kick pattern (PAD1) and snare pattern (PAD2) remain identical to the linear configuration. Notice that PAD4 in this map is unoccupied—because the second hat position is handled by the split architecture, the open hat is now a deliberate upper-row assignment rather than a cramped fourth-position addition.
Note: Notice that splitting the hi-hat workload depends heavily on which finger initiates the pattern. Because this layout utilizes two separate hi-hat pads, your starting finger may shift depending entirely on how the preceding kick and snare hits are placed. If the dominant hi-hat note lands on Pad 3 versus Pad 5, the physical hand-to-hand transition changes. Consequently, while the visual layout remains linear, the micro-timing and finger choreography required to keep the groove fluid can become quite tricky.
Configuration 3: The Vertical Column Strip
The same groove, now re-expressed vertically. Pad 12 carries the hi-hat stream at the top of the active column; Pad 8 carries the snare; Pad 4 carries the kick. Pad 16 remains unused in this core mapping, serving as a blank top anchor. The hand moves up and down the rightmost column rather than shifting left-to-right across a horizontal row. The identical rhythmic pattern now produces ergonomic wrist and arm movement that is strictly vertical—less fatiguing, more sustainable at high tempo, and naturally consistent in velocity because your finger approach angle never changes between elements.
Configuration 4: The Chop Matrix (Drums + Sample Chops)
Now the beat changes character entirely. Kick and Snare are still present on PAD1 and PAD2, executing their rhythmic pattern unchanged. But PAD3 and PAD4 are no longer auxiliary drum positions—they’re melodic sample chops. The eighth-note hi-hat stream has been replaced by two melodic chop hits that fire on specific offbeats, creating a pattern that is simultaneously rhythmic and melodic. The same groove has become a compositional statement rather than a drum performance.
How to Choose Your Muscle Memory
Every section of this guide has been building toward a single practical question: which layout do you commit to?
This is not a decision to make casually. Pad layout is muscle memory, and muscle memory is one of the most time-intensive skills the human body can build and the most disruptive to abandon. Changing your layout after six months of dedicated practice means not just learning new positions—it means actively fighting existing neural pathways that will try to fire the old pattern every time you sit down to play. Most experienced finger drummers who have changed their primary layout describe the transition period as a genuine skill regression: they play worse on the new layout than a beginner would, because their hands know exactly what to do and keep doing the wrong version of it.
So choose carefully. Not based on what seems easiest right now—based on the style of music you most want to master.
Choose the Linear Baseline if: You’re in the first three months of finger drumming, you primarily build beats in a DAW and supplement with live fills, your tempos stay below 120 BPM, or you’re a keyboard player who needs a functional kit map immediately without committing to a dedicated training regime. The Linear Baseline will let you play music quickly. It will not, however, take you to the upper registers of finger drumming performance. Treat it as a starting foundation, not a permanent home.
Choose the Double-Hat Split if: You want to emulate acoustic drumming with genuine realism, you work in boom-bap, jazz, neo-soul, or any genre where ghost note dynamics and hi-hat hand independence are musically essential, or you’re willing to invest six to ten weeks of deliberate two-handed coordination practice before the layout begins to feel natural. The payoff is the highest ceiling of any layout covered in this guide: once hand independence is established, the Double-Hat Split can produce groove complexity that is simply not physically possible from a linear foundation.
Choose the Vertical Column Strip if: You perform live with physical intensity and need a layout that won’t compromise your wrist health over multi-hour sets, you work across multiple grid controller sizes and need consistent muscle memory that scales, or you’re planning to develop a mirror two-handed layout that gives both hands full rhythmic access. The Vertical Column Strip demands the most significant cognitive reset—it looks nothing like a drum kit on paper—but it rewards players who commit to it with the most ergonomically sustainable performance mechanics of any configuration.
Choose the Chop Matrix if: You are a producer-performer first and a drummer second, you work primarily in the MPC or Ableton workflow tradition, and your artistic goal is fluid real-time composition rather than virtuosic acoustic drumming emulation. The Chop Matrix trades drumming depth for compositional power—accept that trade consciously and it becomes an extraordinarily expressive creative instrument. Fight it while wishing you had a full kit map and you’ll end up with neither.
There is one universal truth that applies regardless of which layout you choose: the layout you practice daily is the layout you’ll perform under pressure. Dexterity built on any of these configurations is genuine dexterity—it transfers, it compounds, and it earns dividends every time you sit down at the pads. The mistake isn’t choosing the “wrong” layout. The mistake is switching layouts before you’ve truly exhausted the one you started with.
Build slowly. Document your patterns. Record your sessions and listen back without watching your hands. The honest audio record of your groove is more instructive than any layout diagram—it tells you exactly where the physical structure of your chosen configuration is helping your music and exactly where it’s still holding you back.
That gap between where you are and where your layout can take you? That’s the practice.
Where to Go Next
Your Launchpad or Maschine finger drumming setup is now correct: the layout mirrors the physical drum kit, your kit has consistent velocity response, your DAW or standalone mode is routed and calibrated, and every pad has been verified with the single-stroke diagnostic.
The next step is structured practice from day one rather than exploring the hardware and hoping something clicks. The 15-minute beginner routine gives you the daily structure. The first five exercises use the exact pad layout above — each drill maps directly to the zone assignments you have just configured. If you want to know what the first month of practice looks like, the 30-day progress guide documents it week by week.


Related
- How to Make Your Beats Sound More Human Without Live Drums
- The Ultimate DIY Hard Case for Maschine MK3 (Step-by-Step)
- Best Finger Drumming Stand Options (And How I Modded Mine)
Your grid is your instrument. Choose your layout not by how easy it feels today, but by the style of music you want to unlock tomorrow.
— ToneSharp