For five weeks, you've been building skill through doing. You learned two-handed coordination, developed timing control and ghost notes, and mastered fills and transitions. All through feel and repetition. That was intentional.
Playing comes first. Theory comes second.
🎯 Why Learning the Language Matters Now
But now you've hit the point where intuition alone creates limits. You know what sounds good, but you can't always explain why. You can play a fill, but you can't reliably recreate it. You understand groove, but you struggle to analyze what makes it work.
Week 6 gives you the language. Not to replace feel—but to sharpen it.
What Changes This Week
You learn to read and write finger drumming patterns. Hand notation reveals inefficiencies you can't hear but can see instantly.
You understand rhythm structure, not just rhythm feel. Pulse, beat, and subdivision become tools you control, not mysteries you chase.
You gain the vocabulary to diagnose your own playing. Ghost note vs soft hit. Fill vs variation. Loop vs phrase. Precision in language creates precision in execution.
This isn't academic theory. This is the bridge between playing by accident and playing on purpose. Between copying patterns and creating your own. Between beginner experimentation and intermediate control.
You've earned the context to understand this. Now let's make it stick.
What's Inside This Guide
🥁 Hand Notation - The Foundation You've Been Missing
Finger drumming is rhythm-first, not pitch-first. Every hit belongs to a hand, not just a sound. That simple fact changes everything about how you should practice, learn, and think about patterns.
Traditional drum notation shows what to hit (kick, snare, hi-hat). Finger drumming notation must show what to hit + which hand + which finger. Without that information, you're copying patterns blindly instead of understanding their logic.
Why L/R Notation Is Non-Negotiable
It reveals efficiency. Two patterns can sound identical but feel completely different based on hand choice. One flows naturally. The other creates fatigue and kills timing.
It prevents bad habits. Most beginners overuse their dominant hand without realizing it. This creates uneven dynamics, rushed timing, and early plateaus. Notation makes this visible instantly.
It enables speed. Fast playing isn't about moving your fingers faster—it's about choosing the right hand for each hit so movement becomes effortless.
Example: Same Rhythm, Different Hand Choice
Here's a simple snare pattern played two ways:
Pattern A (alternating hands):
Hand:  R  L  R  L
Hit:   X  X  X  X
Result: Fast, clean, sustainable.
Pattern B (same hand):
Hand:  R  R  R  R
Hit:   X  X  X  X
Result: Fatigue, timing issues, speed ceiling.
Both patterns play the same notes at the same time. But Pattern A is faster, cleaner, and more sustainable. Pattern B creates fatigue, kills timing, and limits maximum speed. The notation reveals this before you even play it.
The Dominant Hand Trap
Your dominant hand is stronger and more coordinated. That's why beginners naturally overuse it. But that creates problems:
- Uneven dynamics: Your dominant hand hits louder, making grooves sound lopsided
- Rushed timing: Your dominant hand wants to lead, pulling the tempo forward
- Limited ceiling: When one hand does all the work, you hit a speed wall fast
Hand notation exposes this immediately.
Try This Right Now
- Take any groove you've learned in the past five weeks
- Write out the hand assignment for every hit: L or R
- If one hand dominates (70%+ of hits), rewrite the pattern with balanced hand distribution
- Practice the new version
You'll feel awkward at first. That awkwardness is your brain building new pathways. Push through it. In two practice sessions, the balanced version will feel natural—and sound better.
💡 Real Talk: If you resist learning notation because "it kills creativity," you're protecting bad habits. Notation doesn't limit expression—it reveals inefficiency so you can fix it before it becomes permanent.
📊 Notation Systems Compared
Notation isn't neutral. Different systems reveal different things. Choosing the wrong one hides problems. Choosing the right one exposes solutions.
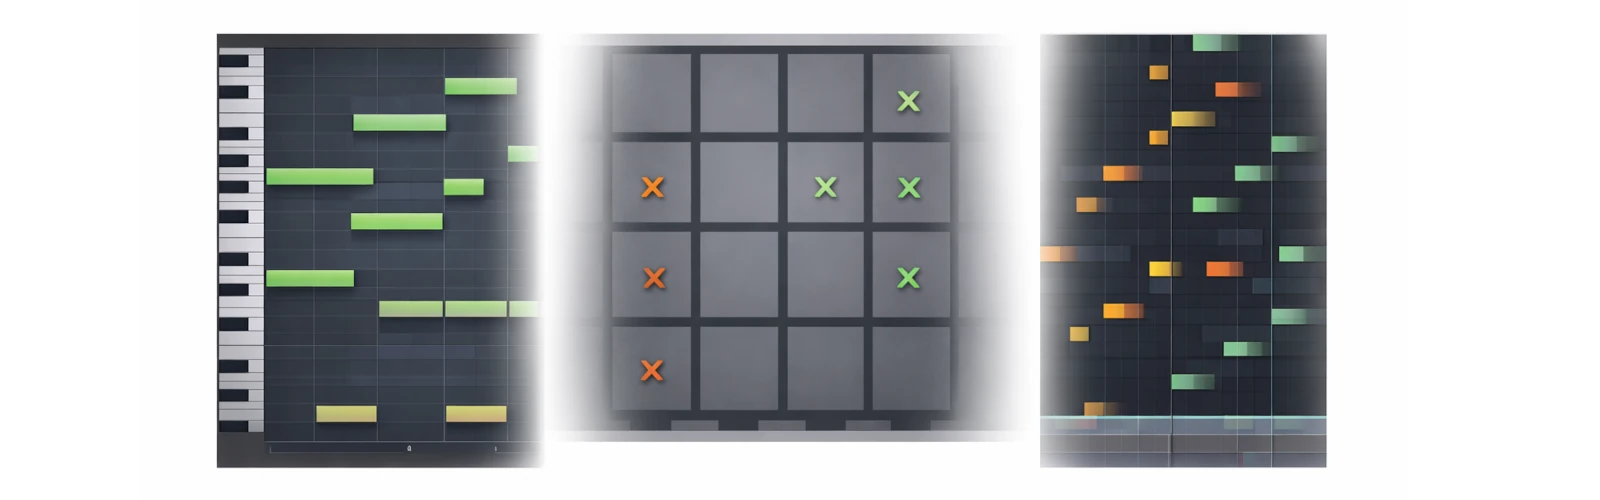
Piano Roll Notation (DAW Style)
Shows: Pitch relationships, note length, arrangement over time
Hides: Hand choice, physical movement, ergonomic efficiency
Best for: Final arrangement in your DAW, sharing patterns with producers, converting finger drumming to MIDI composition
Why it fails for learning: Piano roll assumes pitch order (low to high). Drum pads are arranged by physical position (what your hands can reach). Piano roll makes bad hand habits invisible because it doesn't care which hand hits which note.
Pad Grid Notation (Spatial/Physical)
Shows: Physical pad layout, hand choice, finger assignments, ergonomic flow
Hides: Pitch relationships (if that matters for your pattern)
Best for: Learning new patterns, diagnosing timing issues, building muscle memory, teaching hand technique
Why it works: Your brain learns spatially. When notation matches physical layout, patterns stick faster. You see the movement, not just the notes.
Melodics-Style Notation (Vertical Scrolling)
Shows: Rhythm timing with visual clarity, gamified feedback, color-coded pads
Hides: Hand switching logic, ghost note intent vs execution, advanced dynamics
Best for: Early learning phase, building basic coordination, memorizing simple patterns
Why it's limited: Melodics-style notation is brilliant for beginners. It removes theory barriers and makes rhythm intuitive. But once you have control, you need a system that shows intent, not just execution.
Which System Should You Use?
| Purpose | Best System |
|---|---|
| Learning | Pad grid notation with L/R hand labels |
| Practice | Simplified text notation (what you see in this blog series) |
| Production | Piano roll in your DAW |
You don't have to choose one forever. Use the right tool for the right job. But if you're trying to improve technique, hand-labeled pad grids are non-negotiable.
💡 Common Problem: If you can only play patterns by watching visual cues (pads lighting up, scrolling notation), you don't own the pattern—you're following instructions. Real mastery means playing from internal rhythm, not external prompts.
🎵 Rhythm Fundamentals - Pulse, Beat, Subdivision

If you understand pulse, beat, and subdivision, everything else in rhythm makes sense. If you don't, you'll always feel slightly lost. This is the foundation that holds everything together.
Pulse = Constant Reference
Pulse is the underlying heartbeat of music. It's what you tap your foot to. It exists even when no sound plays. It's the invisible grid that rhythm lives on.
In finger drumming: The metronome click. The steady kick pattern. The internal count that keeps you locked in.
Beat = Musical Grouping
Beats are how pulses are organized. Most music groups pulses into sets of 4 (that's why we say "4/4 time"). Beats define bars and phrases.
In finger drumming: One bar = four beats. An 8-bar phrase = 32 beats. The structure that tells you when to add a fill or change sections.
Subdivision = Internal Timing Grid
Subdivision is how each beat is divided. Quarter notes, eighth notes, sixteenth notes—these are subdivisions. They're what allow you to place notes "off the beat."
In finger drumming:
- Quarter notes (1/4): Steady kick pattern
- Eighth notes (1/8): Hi-hat rhythm
- Sixteenth notes (1/16): Ghost notes, fast fills
Why This Matters
Understanding these three layers explains:
- Why rushing happens: Weak internal subdivision. You're not feeling the space between beats.
- Why ghost notes feel "late" or "early": You're not subdividing the beat correctly in your head.
- Why some grooves feel tight and others feel loose: Subdivision accuracy. Tight grooves have consistent subdivision. Loose grooves don't.
Try This Right Now
Set a metronome to 60 BPM. Count out loud: "1-and-2-and-3-and-4-and." The numbers are quarter notes (beats). The "and" is eighth note subdivisions. Now play:
- Left hand: Quarter notes on PAD1
- Right hand: Eighth notes on PAD3
Feel the relationship between pulse (quarter notes), beat (four-count), and subdivision (the "and"). That's the grid your grooves live on. When you internalize this, timing stops being a mystery.
💡 Real Talk: If you can't count subdivisions out loud while playing, you don't have internal rhythm—you have muscle memory. Muscle memory breaks under pressure. Internal rhythm doesn't.
📖 Essential Terminology
Knowing what things are called gives you power. It lets you search for answers, communicate with other players, and think about your own playing with clarity.
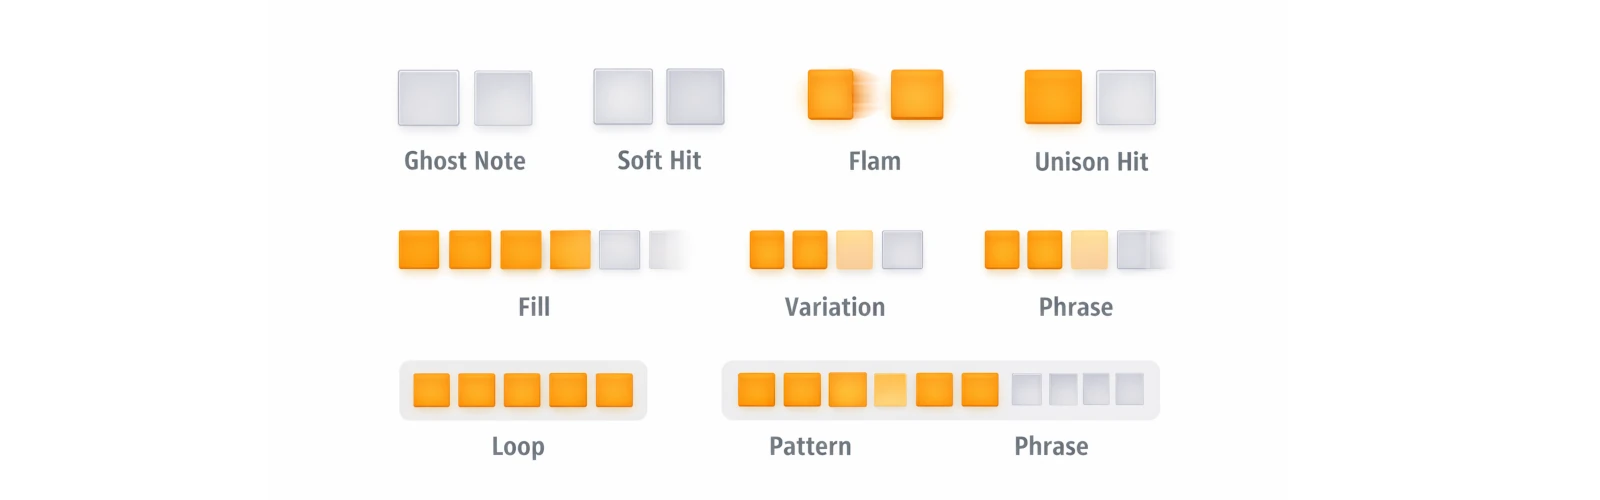
Ghost Note vs Soft Hit
Ghost note: Intentional, rhythmic, barely audible accent. Placed deliberately to create texture and forward motion.
Soft hit: Unintentional lack of volume. Usually caused by poor technique or weak finger control.
The difference: One is technique. The other is a mistake. Ghost notes serve a musical purpose. Soft hits are accidents you need to fix.
Flam vs Unison Hit
Flam: Two hits slightly offset in time (usually 20-40ms apart). Creates a thicker, more textured sound. Intentional timing decoration.
Unison hit: Two sounds simultaneously. Perfect coordination. Both hits land at exactly the same time.
The difference: Flams are rhythmic ornaments. Unison hits are coordination tests. If you're trying to play unison and getting flams, your hand sync needs work.
Fill vs Variation
Fill: Transition phrase. Signals change. Breaks the main groove to move to a new section or reset energy.
Variation: Altered groove. Maintains flow. Changes the pattern slightly while keeping the underlying structure.
The difference: Fills break patterns. Variations evolve them. Knowing which one you need determines what you play.
Loop vs Pattern vs Phrase
Loop: Exact repetition. Technical term. What your DAW does when you hit the loop button.
Pattern: Repeatable structure. Conceptual term. The underlying rhythm that can be varied or developed.
Phrase: Musical statement with beginning, middle, and end. Compositional term. Has shape and direction, not just repetition.
The difference: Understanding this distinction changes how you practice. Looping builds muscle memory. Phrasing builds musicality.
Accent vs Velocity
Accent: Relative emphasis within a pattern. The snare on beats 2 and 4 is accented compared to ghost notes in between.
Velocity: Absolute volume of a hit. MIDI value 0-127. How hard you physically strike the pad.
The difference: Accents are contextual. Velocity is measurable. A ghost note might have velocity 20, but it's still an accent if it's louder than the notes around it.
Syncopation
Definition: Emphasizing off-grid moments. Removing expected accents. Creating groove through silence and unexpected placement.
Why it matters: Syncopation is what makes grooves feel alive instead of robotic. It's the difference between a metronome and music.
Try This Right Now
Go back to Week 4's ghost note groove. Rewrite it using proper terminology:
- Mark which hits are accents and which are ghost notes
- Identify the syncopated kick placement
- Label the subdivision (eighth notes on hi-hat)
Using precise language forces you to think precisely about what you're playing. Precision in language creates precision in execution.
💡 Real Talk: If you can't describe what you're playing using these terms, you don't fully understand it. And if you don't understand it, you can't deliberately improve it.
⚠️ Why Most Finger Drummers Plateau

This is the section most tutorials skip. But it's the most important one. Because skill isn't just about what you practice—it's about how you think while practicing.
Most finger drummers plateau between 3-6 months. They can play clean grooves, execute basic fills, and maintain timing. But they can't break through to the next level. Here's why.
Plateau #1: They Practice Patterns, Not Transitions
The problem: Endless looping of 4-bar grooves. No work on fills, recoveries, or section changes. Result: Clean loops, messy performances.
Why it happens: Practicing loops feels productive. You get smooth fast. But real music isn't loops—it's transitions between sections. If you never practice the hard parts (entering a fill, landing back in groove), you never develop those skills.
The fix:
- Practice the last bar of a groove + fill + first bar of next section
- Focus on recovery as much as execution
- Think in 8-bar phrases, not 4-bar loops
Plateau #2: They Ignore Hand Intent
The problem: Copying patterns without understanding hand choice. Relying on "whatever feels natural" (which reinforces bad habits). No awareness of ergonomics or efficiency.
Why it happens: Hand notation feels like extra work. It's easier to just "play what sounds right." But "what feels natural" is often "what your dominant hand wants to do," which creates long-term limitations.
The fix:
- Write out L/R notation for every pattern you learn
- Film yourself and analyze hand movement
- Deliberately practice "wrong hand" versions to build flexibility
Plateau #3: They Rely on Visuals Instead of Internal Pulse
The problem: Eyes glued to pads or screens. Can't play without visual reference. Timing collapses when visual cues disappear.
Why it happens: Visual feedback is addictive. Pads lighting up, notation scrolling—it feels like you're learning. But you're not learning rhythm. You're learning to follow instructions.
The fix:
- Practice with eyes closed
- Count out loud while playing
- Record yourself and listen back without watching
Plateau #4: They Never Learn the Language
The problem: Can't explain what they're doing. Struggle to search for solutions. Hit skill ceiling because they can't diagnose problems.
Why it happens: You can get pretty far on feel alone. But eventually, intuition runs out. Without language to describe what you're doing, you can't analyze it. And if you can't analyze it, you can't improve it.
The fix:
- Use proper terminology when describing your playing
- Study notation systems (like you're doing right now)
- Engage with other drummers using shared language
The Cognitive Load Problem
Here's something nobody talks about: too much visual information kills timing.
When you're staring at 16 pads, reading scrolling notation, watching your fingers, and trying to count—your brain overloads. Timing suffers first. Then dynamics. Then musicality.
The solution: Fewer inputs during practice. Focus on one thing at a time. Feel before sight. Sound before visuals.
The Ergonomics Issue
Finger fatigue isn't separate from timing accuracy—it's directly connected. Bad hand choice creates tension. Tension creates fatigue. Fatigue kills timing. It's a cycle.
The solution: Relaxed fingers improve timing. Efficient hand choice reduces fatigue. Proper notation reveals both problems before they become permanent.
Self-Assessment
Identify which plateau trap you're in:
- Pattern practice: Can you execute a clean fill and land back in groove without hesitation?
- Hand intent: Can you explain why you chose right hand vs left hand for each hit in your last pattern?
- Visual dependency: Can you play your best groove with your eyes closed?
- Language gap: Can you describe your playing using terms from this post?
Be honest. The plateau you identify is the one you need to fix first.
💡 Real Talk: The plateau isn't failure. It's feedback. Your body is telling you: "We've gone as far as we can with current methods. Time to upgrade the approach." Listen to it.
Week 6 Practice Guide
Daily Practice (15-20 minutes)
- Notation Practice (5 min): Write out L/R notation for one pattern you already know
- Subdivision Drill (5 min): Count out loud while playing ("1-and-2-and-3-and-4-and")
- Eyes-Closed Practice (3 min): Play a familiar groove without looking at pads
- Terminology Drill (2 min): Describe what you just played using proper terms
- Transition Work (5 min): Practice groove → fill → groove (not just endless loops)
Progress Markers
You're succeeding if you can:
- Write L/R notation for any pattern you play
- Identify whether a hit is an accent, ghost note, or soft hit
- Count subdivisions out loud while maintaining groove
- Explain the difference between fills and variations
- Notice when one hand is doing 70%+ of the work
What You've Actually Built This Week
If you can use the terminology from this post to describe your playing, write basic L/R notation, and identify which plateau trap you're avoiding, here's what you've developed:
- Diagnostic ability: You can analyze your own playing and identify specific problems
- Precision in practice: You know what you're working on and why it matters
- Shared language: You can learn from other drummers, search for solutions, and communicate clearly
- Foundation for growth: You're not just copying patterns—you understand the logic behind them
That's real progress. You're not just playing anymore. You're thinking like a musician.
What's Next?
Week 7 will explore different genres and styles through iconic beats. You'll learn how hip-hop, house, trap, and other genres approach rhythm differently—and how to adapt your technique to each style. But only move forward if you can confidently use the language learned this week. Terminology, notation, and theory aren't optional extras—they're the foundation that lets you learn any genre effectively.
Don't skip the fundamentals. Don't chase complexity before you have clarity. This week covered the essential foundation of notation and terminology—enough to transform your practice immediately. Future posts will dive deeper into advanced notation systems, music theory, and analytical techniques. But what you learned this week is what separates intermediate players from advanced ones. Get this right, and everything else becomes easier.
Free Tools & Resources for Continued Growth
Everything you've learned so far can be practiced with just your controller and a metronome. That's intentional—these fundamentals don't require special tools.
But if you want a structured way to review these concepts, I've created a free course that walks through Weeks 1-6 with interactive demonstrations, downloadable materials, and practice files. It includes:
- Browser-based rhythm trainer (web-based, no installation)
- Notation sheets (PDF format)
- TuxGuitar tablature
- Project files for Maschine and Ableton
- MIDI patterns that you can load into your own setup
It's not required. It's just another tool if you find it helpful. Some people learn better with structured materials. Others prefer figuring things out on their own. Both approaches work.

Consistent practice with proper language and notation strengthens everything you've built. Keep playing, stay analytical, and enjoy the process of mastering the fundamentals.
Stay focused. Stay precise.
— ToneSharp