🥁 Why Drum Synthesis Will Transform Your Production
You've probably invested in quality drum samples. Maybe you've got some solid packs from Vengeance, Splice credits, or curated collections on your hard drive. Your sample library has kicks, snares, and hi-hats ready to go.
But have you ever felt limited by what's available? Like you can hear the perfect drum sound in your head, but can't quite find it in any pack?
Here's the game-changer: What if you could CREATE exactly what you're hearing, instead of searching for it?
Sample libraries are incredibly valuable tools—they're professionally recorded, immediately usable, and perfect for many situations. But they represent someone else's creative decisions. When you synthesize your own drums, you're not replacing your sample library—you're expanding beyond it.
Think of it this way: samples give you ingredients, but synthesis gives you the recipe. You can craft drums that fit your exact vision, with complete control over every sonic parameter. Your tracks become instantly recognizable because the drums are tailored specifically to your sound.
I'm talking about synthesis. Specifically, drum synthesis in Maschine MK3.
And before you think "synthesis is complicated" or "I'm not a sound designer," let me stop you right there. Maschine's Drumsynth engines are designed for music producers, not sound design nerds. They're intuitive, playable, and ridiculously powerful.
By the end of this guide, you'll be building custom kicks, snares, and hi-hats that complement your sample library—giving you unlimited creative possibilities and a truly unique sonic palette.
What You'll Learn in This Guide
- Why Add Synthesis to Your Workflow
- Why Drumsynths Are Your Secret Weapon
- Understanding Maschine's Drumsynth Architecture
- Building Your First Custom Kick from Scratch
- Crafting Snares That Actually Snap
- Hi-Hats and Percussion: The Details That Matter
- Advanced Techniques: Layering and Processing
- From Sounds to Patterns: Building Complete Drum Kits
🎯 Why Add Synthesis to Your Workflow
Sample libraries are powerful tools that every producer should have. But synthesis offers something different—complete creative control:
Total Customization
With synthesis, you're not starting with a finished sound—you're building it from scratch. Want to adjust the pitch envelope? You control it from the start. Need a specific tonal character? You shape it exactly as you hear it. Instead of working around a pre-made sample, you're designing the sound with your track in mind.
Unique Sonic Identity
Synthesis helps you develop a signature sound. While sample packs are shared across thousands of producers, synthesized drums are uniquely yours. This doesn't make samples "bad"—it means you have another powerful tool for standing out and creating something distinctive.
Deeper Sound Understanding
Learning synthesis teaches you how drum sounds actually work. You'll understand why a kick feels punchy, why a snare cuts through a dense mix, and how to achieve specific characteristics. This knowledge makes you better at everything—including selecting and processing samples.
The difference between a good producer and a great one isn't choosing between samples or synthesis—it's understanding sound deeply enough to use both tools masterfully.
This is where drum synthesis becomes a superpower in your production arsenal.
⚡ Why Drumsynths Are Your Secret Weapon
Drum synthesis isn't new. The TR-808, TR-909, and Linn LM-1 literally defined entire genres using synthesized drums. Hip-hop, techno, house—these styles were built on the back of drum machines that generated sounds, not played back samples.
But here's what makes Maschine's Drumsynths different:
They're Designed for Playability
These aren't academic modular synth experiments. Every Drumsynth in Maschine has been optimized for immediate musical results. The parameters are intuitive. The sound quality rivals hardware units costing thousands. And they respond beautifully to velocity—meaning your performance actually shapes the sound.
They're Integrated Into Your Production Flow
Unlike standalone drum synth plugins that feel like separate applications, Maschine's Drumsynths live right inside your Sound slots. They work seamlessly with groups, scenes, and patterns. You can automate parameters, process them with effects, and layer them with samples—all within the same ecosystem.
They Give You Infinite Variations
Need a kick with slightly more attack? Twist a knob. Want the snare to decay faster? Adjust the envelope. Building variations that work together becomes effortless because you're working with the fundamental parameters, not destructive processing.
And here's the kicker: Drumsynths teach you how sounds work. After building a few custom kicks, you'll start hearing commercial tracks differently. You'll recognize synthesis techniques. You'll understand why certain drums sound the way they do. This knowledge makes you a better producer, even when you DO use samples.
🔧 Understanding Maschine's Drumsynth Architecture
Before we dive into building sounds, you need to understand how Drumsynths fit into Maschine's workflow.
Where They Live
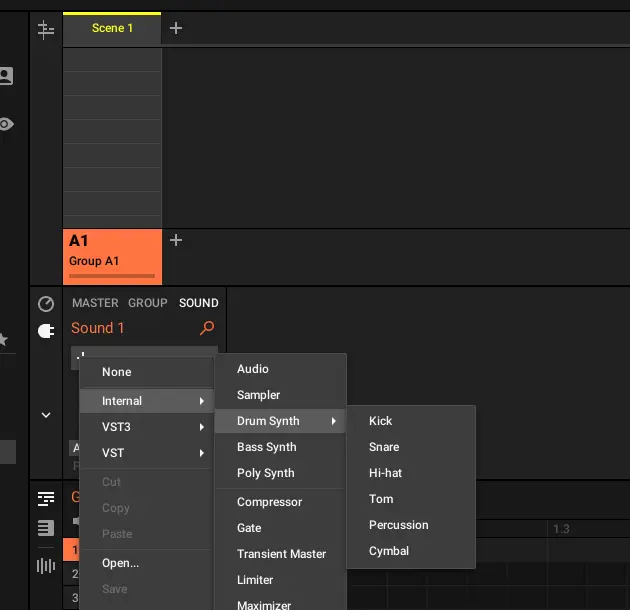
Drumsynths are internal instruments, which means they load into the first plugin slot of any Sound. Open the plugin browser, navigate to Instruments → Drumsynths, and you'll find six specialized engines, each designed for specific drum types.
Unlike sample players, Drumsynths generate audio in real-time. This means zero loading time, minimal CPU usage, and the ability to make changes instantly without bouncing or reloading.
How They Work
At their core, Drumsynths use a combination of oscillators, noise generators, filters, and envelopes to create drum sounds. But don't let that technical description scare you—the interface is designed around musical parameters, not engineering specifications.
Each Drumsynth has a different synthesis engine optimized for its drum type. The kick Drumsynth focuses on pitch sweeps and body resonance. The snare Drumsynth combines tonal elements with noise. The hi-hat Drumsynth uses metallic oscillators and tight envelopes.
The Six Drumsynth Engines Explained
Kick: Built around a pitch-swept oscillator with body and click controls. Perfect for everything from deep 808-style subs to aggressive EDM kicks.
Snare: Combines tonal body with adjustable noise character. Ranges from tight, cracky snares to huge rock drums.
Hi-Hat: Uses metallic oscillators and noise for realistic closed and open hat sounds. Surprisingly versatile for percussion elements too.
Tom: Focuses on resonant pitch envelopes and body shaping. Great for fills and melodic tom work.
Percussion: A flexible hybrid engine for creating bongos, congas, woodblocks, and unique textural elements.
Cymbal: Specialized for crash and ride sounds using complex metallic resonators.
How Drumsynths Integrate with Your Workflow
Here's what makes this system powerful: Drumsynths behave exactly like sample-based sounds in Maschine.
You can:
- Assign them to pads and trigger them like any other sound
- Apply insert effects (compression, EQ, saturation) in the sound FX chain
- Route multiple Drumsynth sounds to the same group for processing
- Automate parameters throughout your patterns and arrangements
- Layer Drumsynths with samples for hybrid sounds
- Save your creations as custom kits and share them across projects
This integration is crucial because it means learning Drumsynths doesn't require learning a new workflow. If you already know how to program drums in Maschine, you already know how to work with Drumsynths.
💥 Building Your First Custom Kick from Scratch
Let's get practical. Open up Maschine and follow along—we're building a kick drum from absolute zero.
Step 1: Load the Kick Drumsynth
Create a new sound on an empty pad. In the plugin browser, navigate to Instruments → Drumsynths → Kick. Load it into the sound slot. Hit the pad—you'll hear a basic kick sound. It's not amazing yet, but that's the point. We're going to shape it into exactly what we need.
Step 2: Understand the Key Parameters
The Kick Drumsynth interface is divided into clear sections. Note that MASCHINE parameters use normalized values (typically ranging from 0.0 to 1.0, or -1.0 to 1.0 for bipolar controls), not percentages.
Engine Selection: Each Kick Drumsynth offers multiple engines (Sub, Tronic, Dusty, Grit, Rasper, Snappy, Bold, Maple, Push). The engine determines the fundamental character of your kick. Sub provides pure sine waves perfect for 808-style kicks, while engines like Tronic and Grit offer more aggressive, electronic tones.
Pitch Section: This controls the fundamental frequency sweep that gives kicks their signature "boom." The TUNE parameter sets the starting pitch (measured in semitones), while DECAY determines how quickly the pitch envelope drops to zero. For deep, subby kicks, use lower tune values with longer decay times. For aggressive, punchy kicks, use higher tune values with faster decay.
Body Parameters: Most kick engines include body-shaping controls that affect the tonal character. These might include resonance controls, saturation, or additional harmonic content depending on the engine selected.
Click/Punch Parameters: The attack transient that helps your kick cut through busy mixes. These controls determine the brightness and level of the initial transient. For modern electronic music, you want this audible but not dominant.
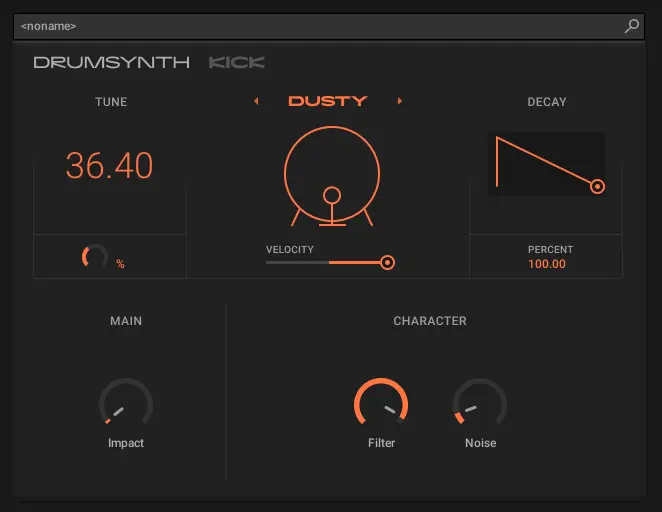
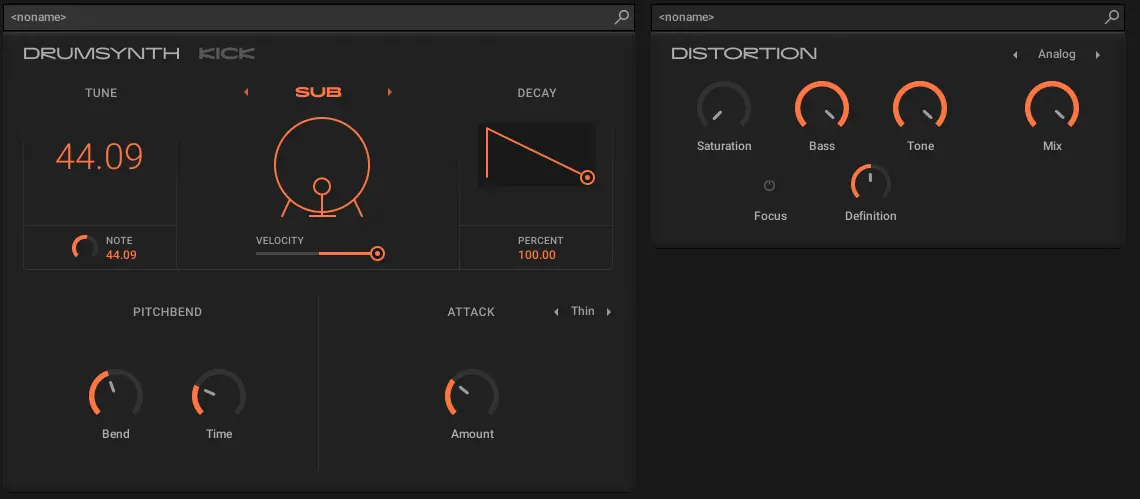
Step 3: Build a Deep, Subby Kick
Let's create a kick similar to an 808—perfect for trap, hip-hop, and melodic bass music using the Sub engine.
- Select the Sub engine - This provides the pure sine wave fundamental perfect for sub bass
- Set Tune to around 37 to 45 - This places your fundamental in sub-bass territory
- Increase Decay to 80-100 - Gives that long, descending pitch sweep characteristic of 808s
- Adjust Bend if available - This parameter affects the pitch sweep curve
- Keep Click/Punch Level moderate
- Use Drive sparingly - Low values (0.1-0.3) add warmth without distortion
Play your pad with different velocities. Notice how the sound responds dynamically? That's the beauty of synthesis—your performance shapes the final result.
Step 4: Build an Aggressive EDM Kick
Now let's go the opposite direction—a hard-hitting kick for house, techno, or hardstyle using the Tronic engine.
- Select the Tronic engine - Designed for electronic, punchy kicks
- Set Tune to 30-50 - Higher fundamental for more presence
- Decrease Decay to 40-50 - Fast, tight pitch envelope
- Add Drive for aggression - Values around 0.5-0.7 create harmonic saturation
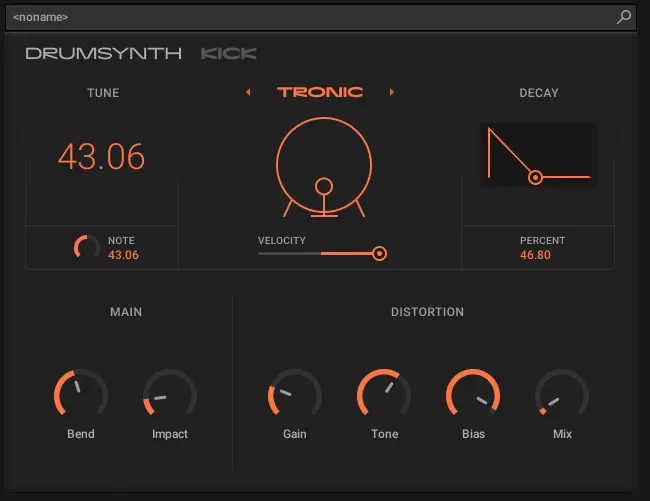
Hear the difference? Same plugin family, completely different character. This is the power you get when you understand the parameters.
Pro Tips for Kick Design
Use the Noise section sparingly: A tiny bit of filtered noise (0.05-0.1 level) adds analog character without washing out your tone.
Watch your gain staging: Drumsynths can hit HARD. Keep an eye on your meters and leave headroom for processing (aim for peaks around -6dB).
Experiment with velocity curves: In the Sound settings (Scale section), adjust the Velocity parameter to match your playing style. Remember: at 0%, velocity has no effect (always full volume). Positive values increase velocity response, negative values invert it (harder hits = quieter sounds).
Don't forget tuning: Kicks have pitch. Tune them to your track's key for tighter, more cohesive mixes. Even a few semitones can make a huge difference in how your kick sits with basslines.
🎵 Crafting Snares That Actually Snap
Snares are trickier than kicks because they're more complex—combining tonal body with noisy rattles and snappy attacks. But that complexity also means more creative possibilities.
Understanding Snare Synthesis
Real snares produce sound from two sources: the drumhead (tonal) and the snares themselves (rattling wires underneath). The Snare Drumsynth models both elements separately, giving you independent control over each.
The Main section controls the drumhead—its pitch, decay, and tonal character. This determines whether your snare sounds high and tight or low and fat.
The Noise section simulates the snare wires—that characteristic rattle and sizzle. The filter type, cutoff, and decay shape this element.
Building a Classic Hip-Hop Snare
Let's create a snare with punch and character—perfect for boom-bap, trap, or modern hip-hop using the Volt engine.
- Select the Volt engine - Classic electronic snare character
- Set Tune Pitch around 60-70 - Natural snare fundamental
- Set Tune Decay to 20-40 - Quick decay for tightness
- Adjust Noise Color and Amount to taste - Higher frequencies for brighter, lower for darker

The magic happens when you balance these three elements. Too much tone and it sounds like a tom. Too much noise and it's just white noise. Too much snap and it becomes a click. The sweet spot is where all three work together.
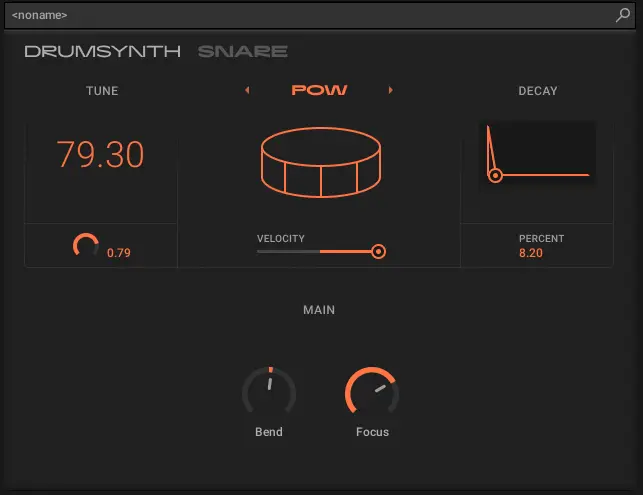
Building an Aggressive Electronic Snare
For harder electronic genres, you want a snare that's more synthetic and in-your-face.
- Select an electronic engine - Try Volt, Bit, or Pow
- Reduce Tune Level to 79 - Less body, more character
- Shorten Tone Decay to 8-8.2 - Ultra-tight
- Increase Noise Level/Focus to 72 - Prominent rattle
The Velocity Sensitivity Secret
Here's something most tutorials don't mention: Snare Drumsynths respond dramatically to velocity. Soft hits sound fundamentally different from hard hits—not just quieter, but tonally different.
This means you can program realistic, human-feeling snare patterns by varying velocity. Ghost notes become actual ghost notes. Accents become actual accents. Your drum programming suddenly has dimension and dynamics.
Try this: Program a simple four-bar pattern with varying velocities. You'll hear the snare character shift with each hit. This is impossible with static samples but natural with synthesis.
🎩 Hi-Hats and Percussion: The Details That Matter
If kicks and snares are the backbone of your rhythm, hi-hats and percussion are the nervous system—the details that bring patterns to life and create groove.
The Hi-Hat Drumsynth Architecture
Hi-hat synthesis is unique because it focuses on metallic, inharmonic tones. Real hi-hats produce frequencies that don't follow musical scales—they're complex, noisy, and difficult to synthesize convincingly.
MASCHINE's Hi-Hat Drumsynth uses a combination of six metallic oscillators tuned to create that characteristic cymbal shimmer. You don't control individual oscillators directly—instead, you shape the collective sound using musical parameters.
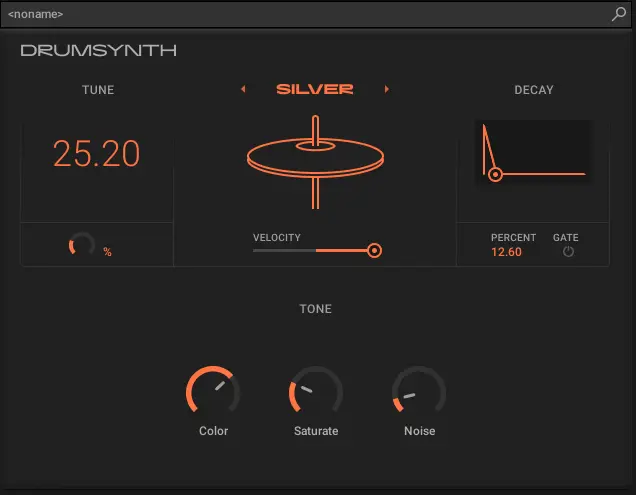
Creating Closed Hi-Hats
- Select Silver or Circuit engine - These provide classic closed hat tones
- Keep Decay very short - Around 20-30 for tight, classic closed hats
- Adjust Tune to change metallic character - Lower values for darker, higher for brighter
- Use Color to add frequency complexity - Subtle changes (6-10) create variation
Creating Open Hi-Hats
Open hats require a completely different approach—longer decay, more complexity, and careful balance to avoid harshness.
- Select Silver or Hybrid engine - More complex harmonic content
- Increase Decay to 70-80 - Let it ring naturally
- Adjust Tune slightly higher than closed hats - More shimmer (50-70)
- Increase Color for complexity

Percussion Drumsynth: The Creative Wildcard
The Percussion Drumsynth is where things get interesting. Unlike the other Drumsynths that focus on specific drums, this one is designed for creative sound design.
You can create:
- Bongos and congas by emphasizing the tonal section with moderate decay
- Woodblocks and claves using short, snappy envelopes with minimal body
- Shakers and rattles by balancing noise with short decay times
- Completely unique electronic percussion that doesn't exist in the real world
The key is experimentation. The Percussion Drumsynth rewards exploration more than the others because its parameters are intentionally flexible.
🚀 Advanced Techniques: Layering and Processing
Once you're comfortable building individual drum sounds, it's time to take things further.
Layering Drumsynths with Samples
Here's a technique that combines the best of both worlds: use Drumsynths for body and character, samples for details and realism.
For example, build a kick with the Kick Drumsynth, then layer it with a short sample of just the attack transient from a real kick. The Drumsynth provides the customizable body and weight, while the sample adds organic texture.
In MASCHINE, you can do this by creating separate sounds and blending them at the group level. The advantage of separate sounds is independent processing—compress the Drumsynth differently than the sample for maximum control.
Processing Drumsynths Like a Pro
Saturation is your friend: Drumsynths can sound very clean—sometimes TOO clean. Add subtle saturation (using the built-in Saturator effect) to introduce harmonic content and warmth. Start with Mode set to Tube and Amount around 0.3-0.4.
Strategic EQ cuts: Because you control the synthesis parameters, you might not need as much corrective EQ. Instead, use EQ creatively—cut narrow notches to create pocket for other elements, or boost high-mids (2-4kHz) for presence.
Compression for glue: Light compression (3-4dB of gain reduction) adds cohesion without destroying transients. For parallel compression applications, Drumsynths respond beautifully because they have consistent dynamic behavior.
Reverb on snares and percussion: Drumsynths can sound very dry. Adding room reverb creates space and realism. But be careful—too much reverb and you lose the tight, controlled character that makes synthesized drums powerful. Try short room reverbs with Size around 0.3-0.4 and mix levels of 0.15-0.25.
Automation for Movement
One of the biggest advantages of Drumsynths is real-time parameter control. Unlike samples, you can automate synthesis parameters throughout your track for evolving drum sounds.
Try automating:
- Kick pitch decay - Lengthening it during drops for more sub energy
- Snare noise cutoff - Opening it gradually through a build for tension
- Hi-hat decay - Shortening during verses (10-20), extending during choruses (60-70)
- Body levels - Changing the tonal balance throughout sections
This creates dynamic interest that's simply impossible with static samples. Your drums evolve with your track instead of remaining frozen in time.
🎼 From Sounds to Patterns: Building Complete Drum Kits
Individual drum sounds are great, but music is made from complete kits working together. Here's how to build cohesive Drumsynth-based drum kits.
The Frequency Relationship
Your kick, snare, and hi-hats need to occupy different frequency spaces. When building from scratch, you control this from the start:
- Kick: Fundamental between 40-80Hz, body presence around 80-150Hz
- Snare: Fundamental around 180-250Hz, body between 300-500Hz, snap/crack 2-5kHz
- Hi-hats: Primarily above 5kHz, with some content down to 2kHz
Because you're synthesizing these elements, you can ensure they don't clash. Adjust the Tune on your kick to complement the snare's fundamental. Set your hi-hat Tone to avoid masking snare brightness.
The Tonal Consistency
Professional drum kits sound like they belong together. With samples, this is luck. With Drumsynths, it's design.
Keep your sounds cohesive by:
- Using similar decay curves across sounds
- Matching noise characteristics between snares and hi-hats
- Maintaining consistent click/snap levels for uniform transient response
- Using the same processing chain (or variations of it) on all drum sounds
Saving and Organizing Your Creations
Once you've built a killer kit, save it properly so you can recall it instantly in future projects.
In MASCHINE, save complete groups (with all sounds and processing) as Group presets. Name them descriptively: "Trap Kit 808 Sub" or "House Kit Punchy" tells you immediately what you're loading.
Build a personal library organized by genre or style. Over time, you'll develop signature sounds that define your productions—and because they're synthesized, nobody else has them.
🎯 The Creative Freedom You've Been Missing
Here's what changes when you start building drums from scratch:
You stop compromising. No more "this sample is close enough." You create exactly what the track needs, every single time.
You develop sonic signatures. Listeners might not know it's synthesized, but they'll recognize your productions because your drums sound distinctly yours.
You work faster. Paradoxically, building sounds from scratch becomes quicker than browsing sample libraries because you know exactly how to get the sound in your head.
You understand drums deeply. This knowledge makes you better at choosing samples when you DO use them, better at processing, better at mixing.
Most producers think synthesis is complicated, so they never start. But MASCHINE's Drumsynths aren't complicated—they're intuitive. The interface is designed around musical results, not technical specifications.
You don't need to be a sound designer. You don't need to understand DSP theory. You just need to experiment, listen critically, and iterate.
The tracks you admire—the ones with drums that hit differently—probably use some form of synthesis. Not because samples are bad, but because synthesis provides control that samples simply can't match.
So close those sample browsers. Open up the Kick Drumsynth. Turn some knobs. Hit some pads. Build something that's completely, uniquely yours.
Your drums have been waiting for you to design them.
Stay sharp. Stay creative.
— ToneSharp